Starting a dropshipping business is a great way to kickstart a startup eCommerce store. Drop shipping is a business model in that you can sell customers a unique collection of products and set your product prices, storage, or staff cost. You only need to pay for inventory and shipping management once sold to an actual customer.
Shopify dropshipping services like Oberlo is the most popular app and one of the best way to launch a Shopify dropshipping store quickly and with minimal cost. In this app, you can directly add products to your Shopify store to start selling immediately. Shopify is free to use with a start-free 14-day trial and use the Oberlo app. In this article, you’ll learn the step-by-step process of starting a Shopify dropshipping site.
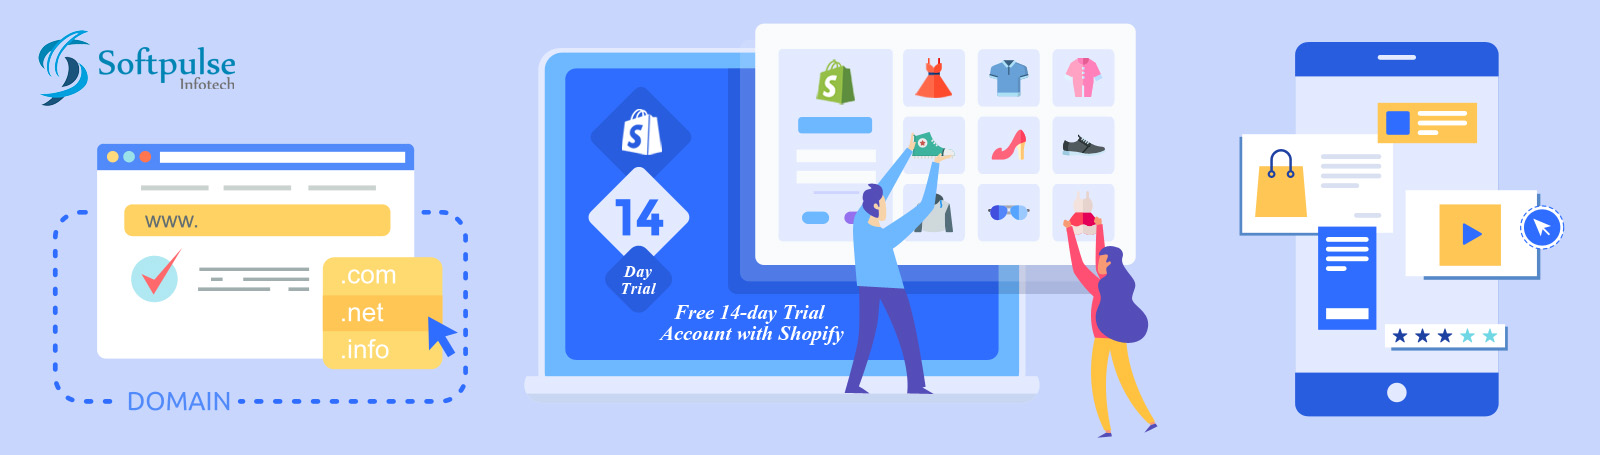
- Step 1: Signing Up for a Free 14-day Trial Account with Shopify
- Step 2: Install & Customize Your Shopify Theme
- Step 3: Install Oberlo App
- Step 4: Add products to your Shopify store
- Step 5: Create a Custom Menu
- Step 6: Choose a Custom Domain Name
- Step 7: Shopify Settings
What & How does dropshipping work?
Dropshipping, in its most basic form, is a retail fulfillment method where a store does not keep the products it sells in stock. Instead, when a store sells a unique collection of products without any inventory storage or staff costs. This means you can run your store without ever holding any inventory.
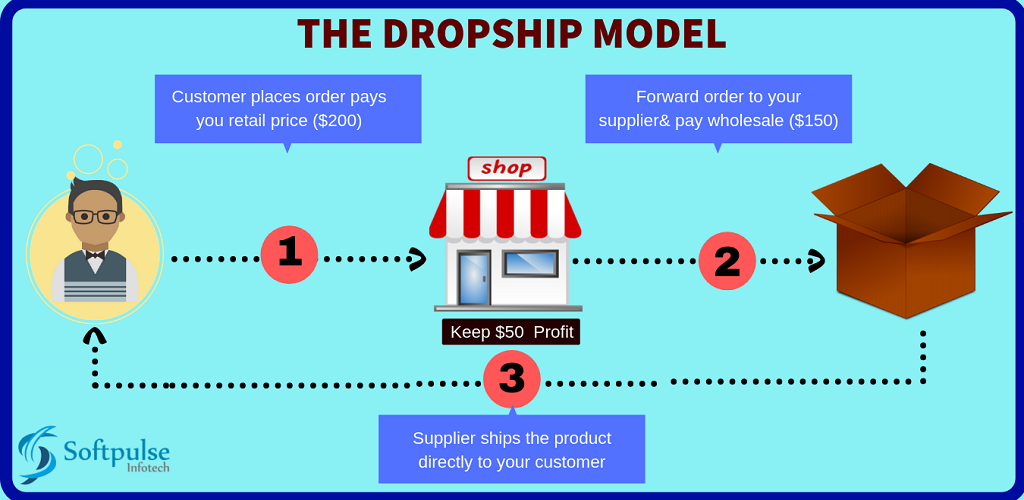
In a Dropshipping business model, the seller markets products direct to customers. Once a customer places an order, the agent routes that order to a supplier, who then ships the product under the seller’s name directly to the customer. The supplier is responsible for maintaining the inventory while the retailer generates orders. You’ll never need to worry about packaging or to ship your products. Why choose Shopify for your dropshipping business? Shopify continues to be one of the best platforms for merchants. That’s because Shopify is drop-shipper-friendly, packed with great features, and easy to use.
Signing Up for a Free 14-day Trial Account with Shopify
First things, register an account with Shopify. It’s straightforward to visit the Shopify website and click the button on start free trial, enter your email address, create a password, and your store name. If you are still determining your business name, don’t worry. You can change your store name and email address anytime in your Shopify store setting.
Upon successfully signing up, Shopify will ask for more information to set up your test store.
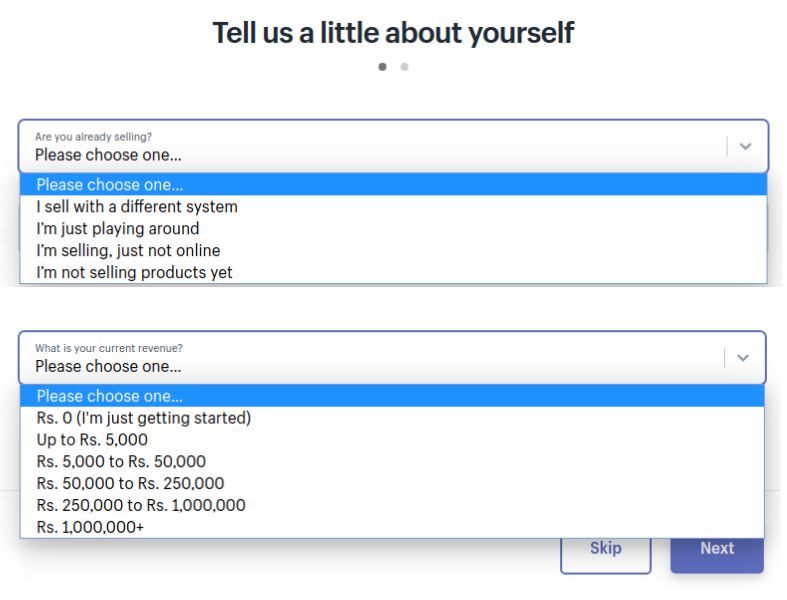
Once you’ve chosen those answers, click “Next” and enter your details. Then you will be redirected to your dashboard, where you can access your store’s backend and front-end.
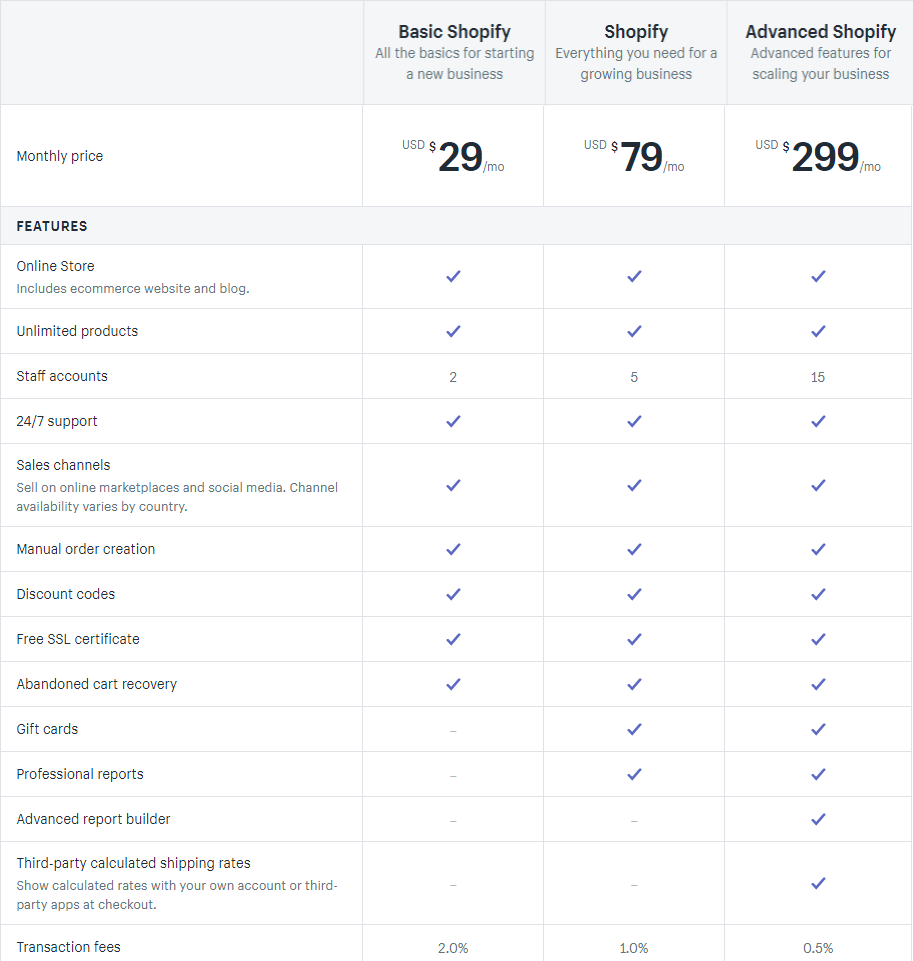
Shopify Plans
Once you have successfully created your Shopify account, you need to subscribe to a plan to unlock all of Shopify’s premium features. There are three plans Basic Shopify, Shopify, and Advanced Shopify, as we mention below.
Now that you have signed up for Shopify, it’s time to move on to step two. How to install and customize Shopify themes.
Install & Customize Your Shopify Theme
Once you’ve set up your Shopify account, you can move on to designing your store. In your dashboard’s theme section, you can explore Shopify’s free themes, browse free, and select paid themes. Click “Online Store” on the left-hand side of your Shopify dashboard, and then you should already be on the themes tab, select free themes depending on your budget.

Now you have selected a theme, click Customize and go back to your Shopify backend.
By default, Shopify gives you them called, Debut. You can customize Theme settings, including the layout of your site, colors, typography, social media, favicon, and the last one is the checkout page. Play around with many options and see what works best for you. When you’re happy with your website to look, click Save.
Install Oberlo App
Just like Android and Apple, Shopify has its app store. Currently, there are over 1,500 different apps in Shopify App Store. To get you started, here’s our list of the top Shopify apps.
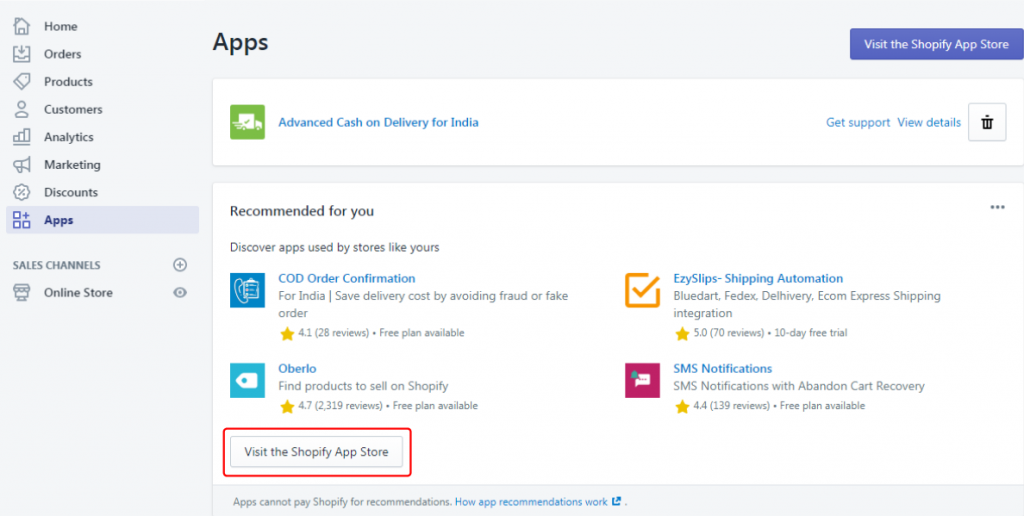
Now we are talking about Oberlo. How do you install the Oberlo app into your Shopify store? Since Oberlo is Shopify’s fully integrated dropshipping supplier network, it is secure and easy to install. The easiest way to do this in a new Shopify store is to click on “Apps” in the left menu. Here, click on the “Visit the Shopify app store” link, and Shopify redirects you to its Shopify app store page.
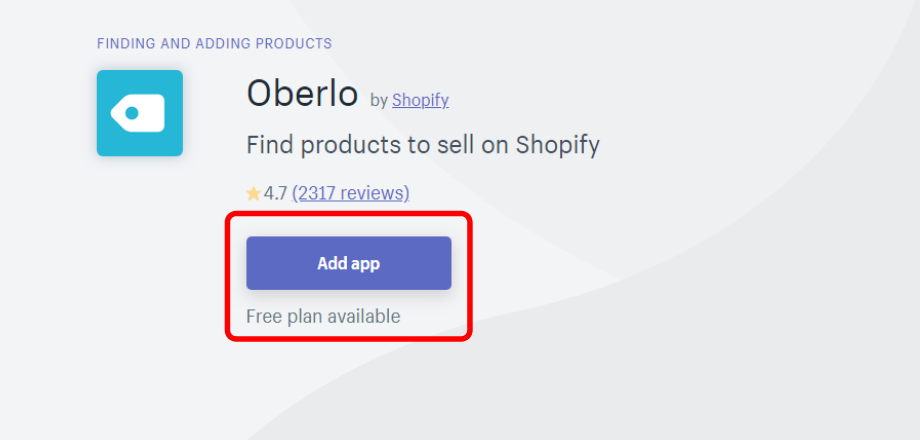
Get Oberlo from the Shopify app store click here, and you will be redirected to the Oberlo installation page. Then, click on the “Add app” button. Read the full description and follow the guidance to install Oberlo app into your Shopify store.
Once you’ve installed the Oberlo app, your new Oberlo drop shipping dashboard will pop up. Here are many benefits you can explore to sell products in your Shopify dropshipping store, research top sellers, and brainstorm ideas.
If you can return to your Shopify dashboard in the lower left corner of the Oberlo screen, you can quickly return to your Shopify dashboard anytime.
Add products to your Shopify store
Thanks to Shopify’s acquisition of Oberlo, adding products you want to dropship is incredibly simple. Once the Oberlo is installed in your Shopify store, you set up your Shopify account. There are several things you can do at this time. You can create your store, add a domain, and add products, among other things.
Oberlo is the default dropshipping app on Shopify, but you can always choose a different solution through the Shopify marketplace.
Edit product details
When you have completed adding products from Oberlo, navigate back to the product’s backend of your Shopify store. You should now see all the items you’ve added from Oberlo. At this stage, you can go through each product and edit these product item details easily.
How to Select Oberlo Products to Sell
When Selecting products to sell in your Shopify dropship store, there are still a few things to keep in the brain before you create a vast product list in Oberlo. Since it’s difficult to tell which products are natural and which are knockoffs, it is best to avoid them altogether. Go with generic products that have high ratings on Oberlo to sell on your online shop.
This item is a good fit for our brand. Based on the product details, for example, this product has excellent and positive reviews from all sellers. So can not hesitate to add the item by clicking add to Import List, but also click on the item to see more information, first likes rating, number of sales, and plenty of details for our description. So, click add to Import List, then continue the same process to identify a few more products.
Create a Custom Menu
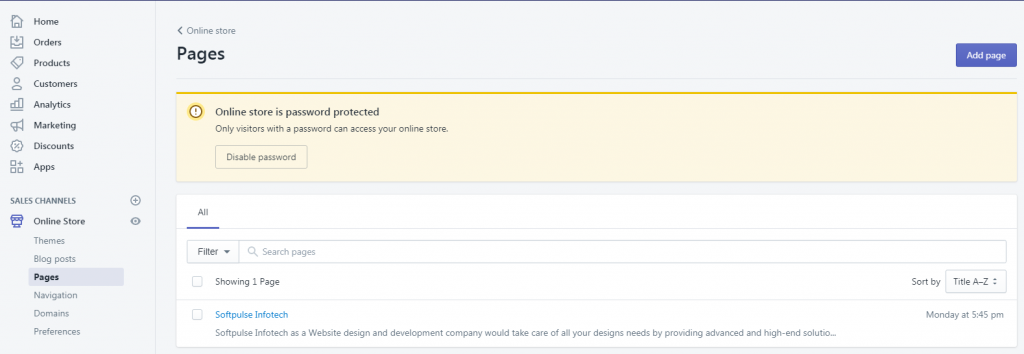
First, you must create pages for your site that will help your visitors know what your shop is all about. These could include you. I highly recommend you create one for your Shopify store. Let’s see how to create a menu.
- About page
- Contact page
- Shipping & Returns
- FAQ
To add any page. Go to Online Store and click pages link, then click add pages.
Once your pages are set up, you can move on to your navigation settings. To find your menus, navigate to an online store, link on the left-hand menu of your Shopify backend from your dashboard, then navigation.
All right, so the first thing you will do is edit the main menu. So click the menu to which you want to add an item, like a link, page, collection, etc. On the menu page, click an additional menu item. Fill in the name of your item, then in the “Link” field, select the relevant item from the list of pages. You get other links to this here. Remember that you can add other items. If you’ve got a blog, you can add your blog here. You can add whatever you like there, really, then go to Save that menu.
Choose a Custom Domain Name
At this point, your Shopify account has been created, and your theme installed. Now you should consider adding a domain name.
If you do not have a domain name, you can buy one through Shopify. You can also purchase a domain from hosting providers like Godaddy and connect it to your Shopify store. Shopify walks you through both options under “Online Store and clicks domains.
Go to the left side column under the online store and then click Domains. Once you’re on that page, you will have three options.
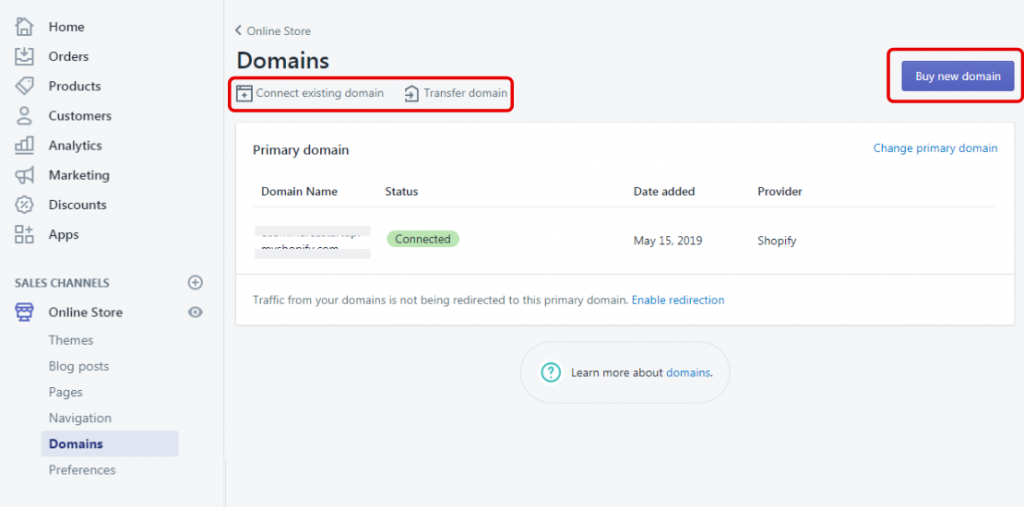
- Connect existing domain
- Transfer domain
- Buy new domain
Connect an existing domain from a third-party domain name registrar (i.e., through a provider like GoDaddy, Hostingraja, etc.). You can connect it with Shopify, so the system points your domain name to your Shopify store.
Transfer a domain to Shopify, where you can manage, pay for, and renew your domain directly from the Shopify backend.
Need a domain? You can buy a domain name through Shopify. Custom domain prices start at USD 14 per year, and if you are also looking to integrate your Shopify store, hire Shopify experts from us and get a free of cost consultation.
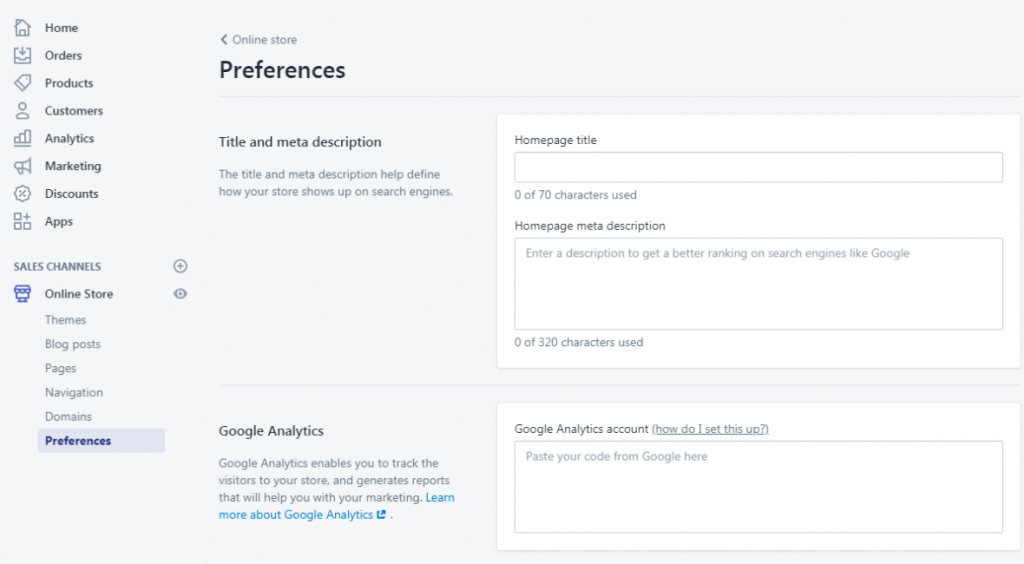
Shopify Settings
One of the most critical steps in finishing the setup of your Shopify dropshipping store is to set the preferences for your site. Go to Online Store and then click Preferences.
From this section, you’ll be able to add your homepage title, meta description, and Google Analytics codes. Using these codes, you can easily track visitors and see what they are doing on your Shopify dropshipping store. You can also add Facebook tracking pixels to re-market to window shoppers who still need to buy.
If you want to remove password protection from your store, you’ll need to sign up for a Shopify plan. There are a few different options for Shopify plans, as we mention in these articles.
Do you enjoy this article on how to open a Shopify dropshipping Store in 7 Easy steps? Leave a comment down below. And don’t forget to share this article with your friends.
At Softpulse Infotech, we build dynamic websites and mobile applications to add value to our client’s businesses. We align ourselves to ensure that our client benefits most from our engagement. If you’re looking for ecommerce solutions for increasing your business, choose the best Shopify development company.