With Shopify’s new checkout and thank you page extensibility, direct pixel loading is deprecated. Instead, the customer events section will now be used to track data, requiring some JavaScript knowledge. This shift can be daunting for many Shopify store owners, but fear not we’ve got you covered.
This guide will use a technical approach to load Google Tag Manager (GTM) and marketing pixels on Shopify’s Checkout and Thank You pages.
Softpulse Infotech can streamline your integration in less than 5 minutes if you want a non-technical solution. Our expert Shopify developer team converted Shopify checkout pixels into custom checkout pixels for the thank you page.
Benefits of Using Google Tag Manager
- Improved Website Performance: Google Tag Manager helps streamline your website by centralizedly managing all your tracking codes and tags.
- Easy Testing and Debugging with Preview Mode: GTM offers a robust preview and debug mode that allows you to test and troubleshoot your tags before deploying them live.
- Faster Implementation of New Features: Adding and updating tags is quick and straightforward with GTM.
- Enhanced Data Accuracy and Reliability: GTM provides a structured and organized approach to tag management, increasing your confidence in the data you collect.
- Cost-effective and Efficient Tag Deployment: Google Tag Manager is a free tool that simplifies the deployment process for various tracking and marketing tags, including Google Ads Conversion Tracking, Remarketing, and Google Analytics.
Changes to Shopify Checkout: What You Need to Know
Shopify has made a significant update that impacts how Google Tag Manager (GTM) can be used in the checkout process for Shopify Plus stores. Starting in November 2022, Shopify began rolling out a new checkout system that gradually restricts the use of GTM within the checkout.liquid file.
Shopify is phasing out the ability to use Google Tag Manager at Shopify checkout liquid file, significantly impacting how Shopify Plus stores manage tracking and customization during checkout.
Key Changes:
- Deprecation of checkout.liquid for GTM: The ability to add custom scripts via the checkout.liquid file is being phased out. While the file will remain in place, it will no longer function as previously. By August 13, 2024, this change will be fully implemented, and any scripts will be added through checkout.liquid will be ignored.
- Increased Security Measures: This change is part of Shopify’s broader initiative to enhance security across its platform, notably during checkout. By restricting custom scripts at checkout and liquid, Shopify aims to create a more secure and consistent customer checkout experience.
- New Customization Options: While GTM can no longer be added directly to checkout, Shopify Plus stores can still customize aspects of the checkout experience through the Shopify admin interface. However, these customizations will not allow GTM scripts to be embedded in the checkout.
- Alternative Tracking Methods: Although you can no longer use GTM during the checkout process, tracking completed orders remains possible through the Order Status (Thank You) page via the Checkout Order Status Script section. However, it’s important to note that this client-side tracking is becoming less reliable over time.
Long-term Impact
This update is a permanent change designed to improve the security and reliability of Shopify’s checkout process. Store owners must adapt tracking and customization strategies to accommodate these new limitations.
Configuring Shopify Custom Events Pixel
The heart of this process involves configuring Shopify’s customer events pixel. This method allows you to customize code per checkout type and add product-level data to the data layer, which GTM understands.
Let’s start by configuring your Shopify’s Customer Events Pixel.
Steps to Configure Shopify’s Customer Events Pixel:
1. Open Shopify Settings: Start by navigating to the Shopify settings in the bottom left-hand corner of your dashboard.
2. Select “Customer Events”: From the left-hand navigation, select “Customer events.”
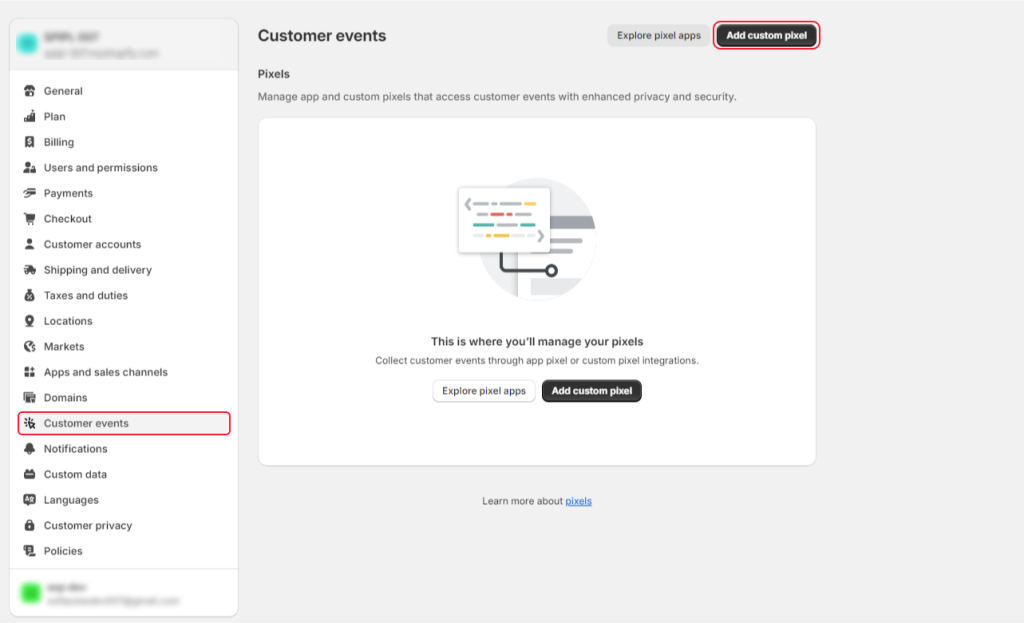
3. Select “Add custom pixel” from the top-right corner
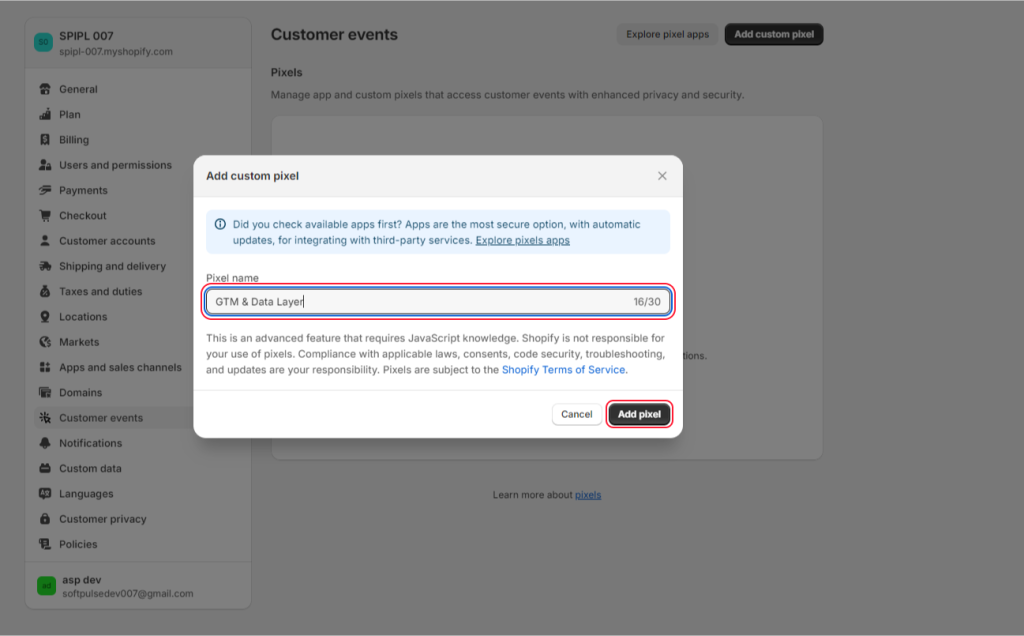
4. Name Your Pixel: For internal tracking, name your pixel. A good example could be “GTM & Data Layer”
5. Remove Shopify Placeholder Text: Clear any placeholder text that Shopify has provided.
6. Input Your Custom Code: This is where you’ll input your custom pixel code.
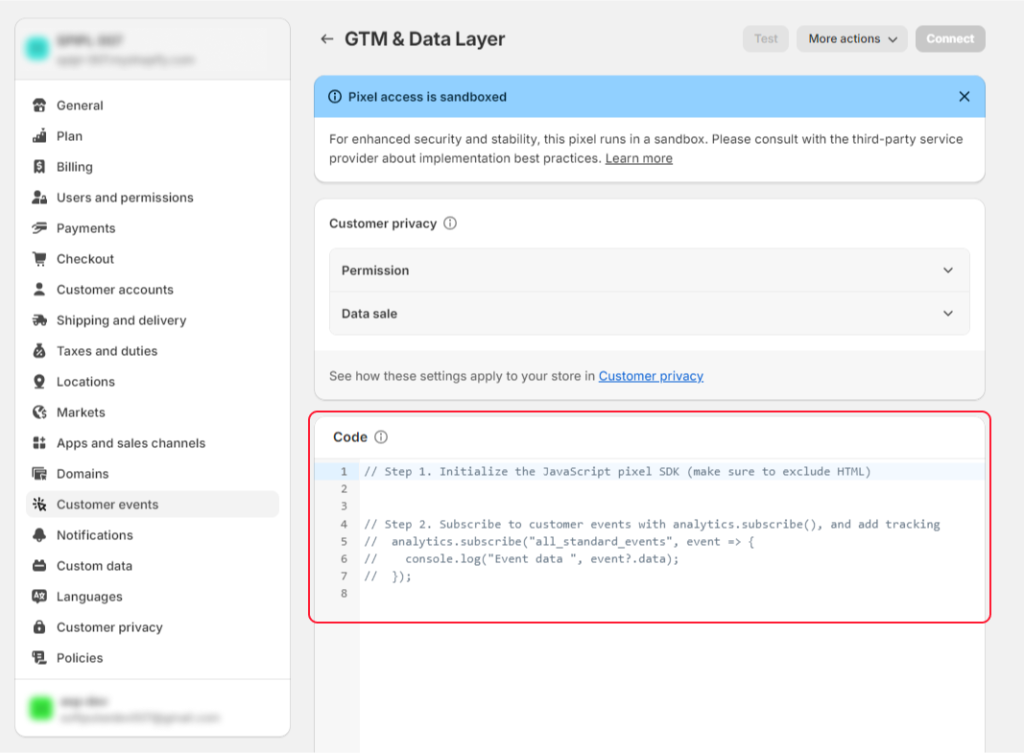
Now that the initial setup is complete, it’s time to start writing your script. Shopify’s help center provides an excellent example of a Google Tag Manager custom pixel that shows how to send data to GTM. This script includes critical events we can listen to and pass data to Google Tag Manager using the data layer.
Understanding the Data Layer in Google Tag Manager
The Data Layer is crucial because it’s the language GTM understands. You’ll need to pull data through Shopify to the data layer so that Google Tag Manager can use it to send information to all your marketing destinations.
Custom Checkout Tracking Code Will Track:
- Checkout Started: Triggers when the checkout page loads.
- Add Contact Information: Triggers when the user adds their contact information.
- Add Shipping Information: Triggers when the user adds their shipping details.
- Add Payment Information: Triggers when the user adds payment information or selects a payment method and clicks “pay now.”
- Checkout Complete: Confirms when the checkout is finished.
- Product Level Data: Captures product-specific data.
Customizing the Script for Your Shopify Store
Now, you’ll need to make some edits to tailor the script to your Shopify store.
Steps to Customize the Script:
- Copy the Relevant Code: If you have a three-page or one-page checkout, copy the relevant code.
- Three-Page Checkout: For this setup, load the provided GTM code at every step: checkout_started, add_shipping, add_payment_info, and checkout_completed.
- One-Page Checkout: For a one-page checkout, load the GTM code on the first event, checkout_started, and the last event, checkout_completed. You won’t need to use the snippet to add shipping or payment information. This is notated in pink in the custom code.
- Update Your GTM ID: Open your GTM container and locate the blue ID in the top right corner. Replace the placeholder GTM ID in your script with your own.
Final Steps: Connecting Your Pixel and Testing
To ensure your pixel is correctly connected and your tracking is active, follow these final steps:
- Save Your Work: Click on “Save” in the top navigation.
- Connect Your Pixel: Click “Connect” at the bottom of the code container.
- Check Status: Navigate to “Customer events” in the left-hand navigation. Your pixel name should show a “Connected” status, highlighted in green. This indicates that your tracking is active and all the GTM events are loading on your checkout and thank you pages.
Using Product Data in Marketing Pixels
If your marketing pixel requires product data, the custom pixel code shared in this tutorial includes a customization that will send product information to your GTM container. However, using this product-level data in your marketing pixels requires configuring a custom JavaScript variable in Google Tag Manager. This step demands JavaScript knowledge, so you should hire a developer or contact Softpulse Infotech for a fast-track, non-technical solution.
Questions About Checkout Extensibility?
Softpulse Infotech supports your transition to Checkout Extensibility as Shopify Plus’s preferred partner. Softpulse Infotech integrates with Shopify Checkout Extensibility to load Google Tag Manager and fire checkout data layer events using the Customer Events setting. Additionally, Softpulse Infotech converts the Shopify checkout pixel into custom checkout pixels for the thank you page.
To learn more about how Softpulse Infotech can support your transition to Checkout Extensibility, don’t hesitate to reach out.