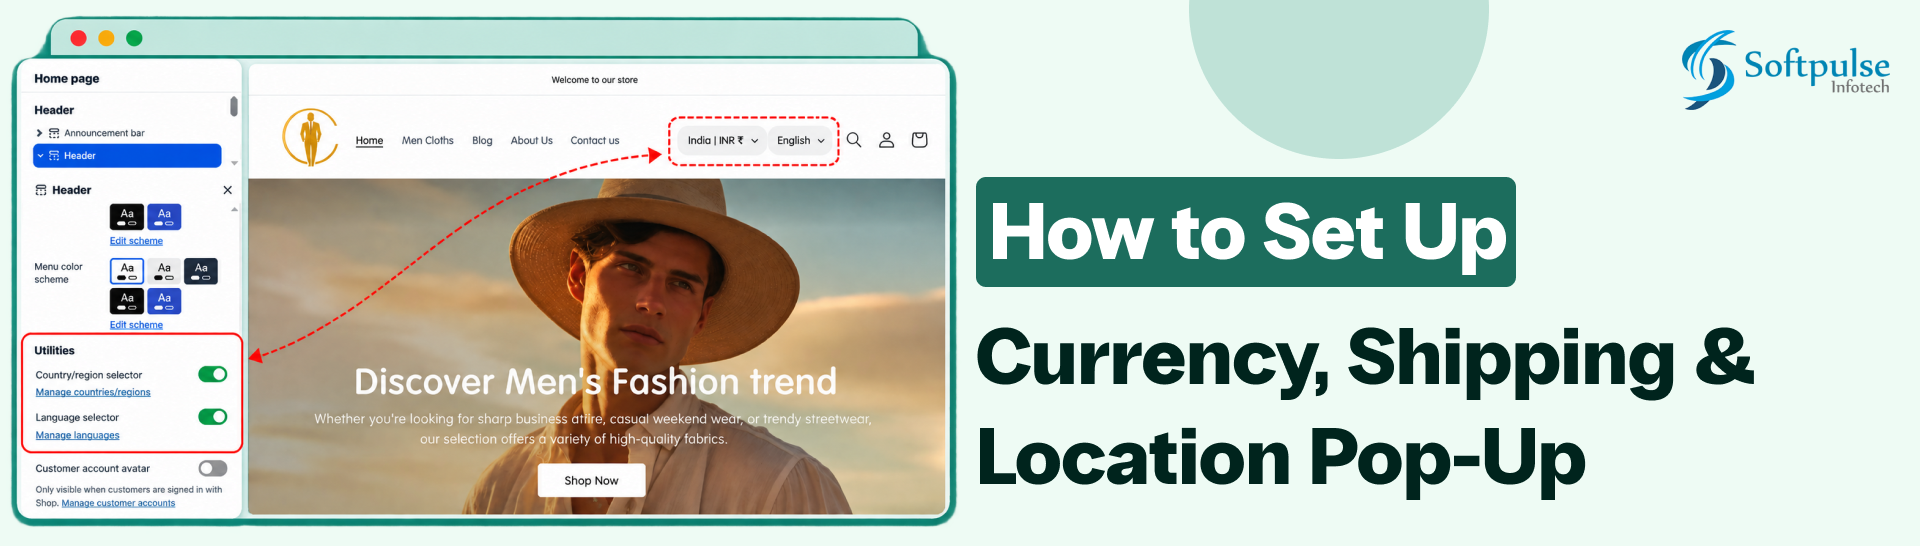
If your Shopify store sells to customers in different countries, you may want to show shoppers the correct currency, shipping options, language, and regional storefront based on where they are located.
A customer from the UK may want to see prices in GBP and understand the available UK shipping options, while a customer from the US may expect USD and different delivery rates. A currency, shipping, and location pop-up can make this experience much clearer by allowing customers to select their country or region before they continue shopping.
Shopify provides Shopify Markets to manage these international selling requirements from a single store. You can create markets for different countries or regions and configure currencies, pricing, languages, domains, taxes, duties, and shipping for each market.
If you also want to display a location popup asking visitors to confirm where they are shopping from, you can combine Shopify Markets with a country selector or a third-party geolocation solution.
In this guide, we’ll explain how to set up the complete process step by step.
You can also use Shopify product metafields to manage additional product information such as specifications, materials, and care instructions. Learn how to add product metafields to your Shopify page.
What Is a Currency, Shipping & Location Pop-Up?
A location popup is a message that appears on your Shopify store and asks customers to select or confirm their shopping location.
For example: Where are you shopping from?
We detected that you’re shopping from the United Kingdom.
United Kingdom — GBP (£)
[Continue Shopping] [Change Country]
After the customer selects a country, the store can use the corresponding Shopify Market so the customer sees the appropriate currency, pricing, language, products, and shipping options.
A typical setup consists of: Shopify Markets
- Countries/regions
- Currency
- Pricing
- Shipping
- Language
- Domain
- Location selector/popup
The popup itself does not create currencies or shipping rates. Those settings need to be configured in Shopify Markets first.
What You Need Before Setting Up the Popup
The popup itself does not create currencies or shipping rates. Those settings need to be configured in Shopify Markets first.
Before creating the location popup, make sure your international markets are configured.
You should have:
- A Shopify store with admin access
- The countries or regions you want to sell to
- Active markets for those countries
- Shipping zones and rates
- Appropriate currencies
- Shopify Payments if you want customers to pay in multiple currencies
Shopify Markets is designed to manage international selling from one Shopify store instead of creating a separate store for every country.
Step 1: Open the Shopify Theme Editor
From your Shopify admin: Markets
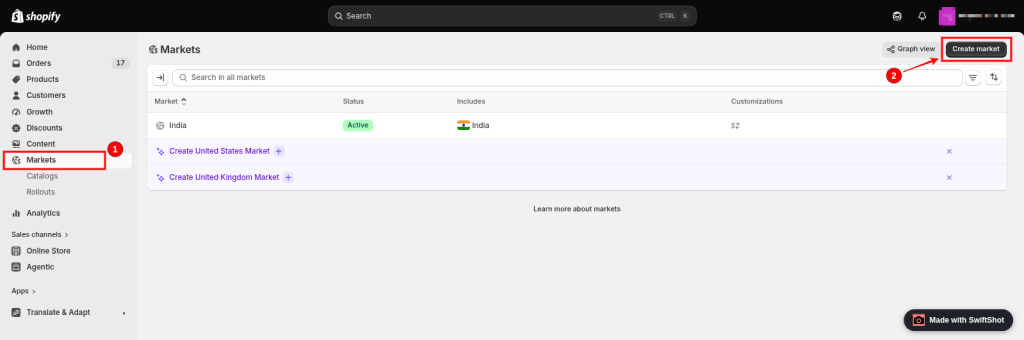
Here you can see your existing markets and create new ones.
Depending on your store, you may already have a primary market and other markets suggested or created by Shopify.
Step 2: Create a Market for a Country or Region
If the country you want to target is not already configured, create a new market.
For example, suppose you want to sell specifically to customers in the United Kingdom.
Go to: Markets → Create market
Then:
- Enter a market name.
- Select the country or countries you want to include.
- Save the market.
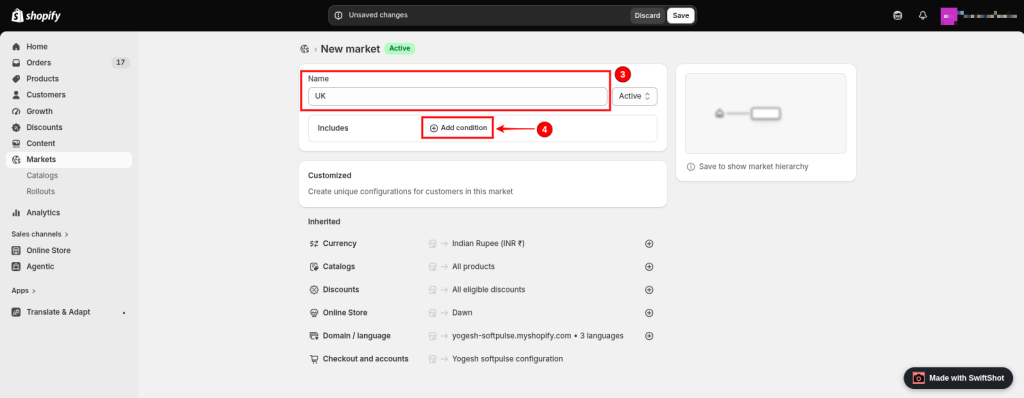
You can create a market for a single country or group multiple countries into one market.
For example: United Kingdom or Europe
When grouping countries, consider whether they share similar:
- Currency
- Language
- Pricing strategy
- Taxes
- Shipping costs
- Product availability
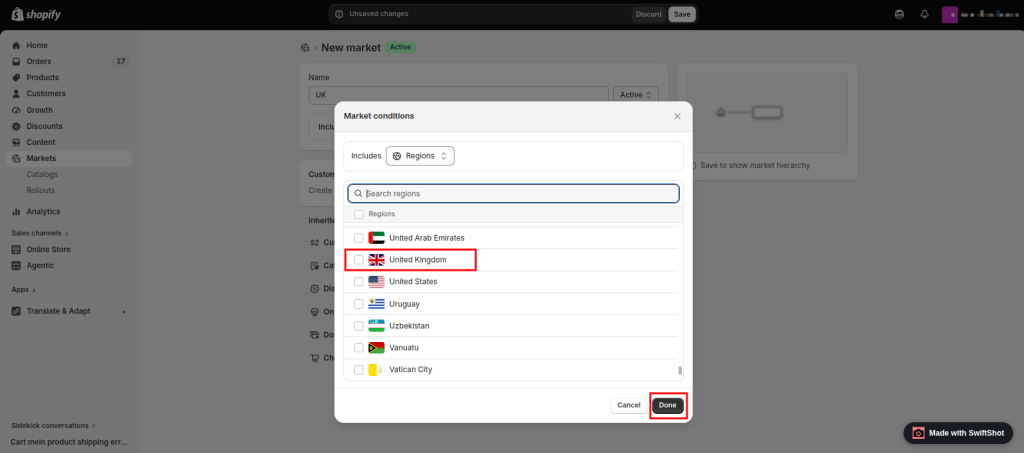
Grouping countries with similar requirements can make your international setup easier to manage.
Step 3: Configure the Market Currency
Once your market is created, configure its currency.
For example:
Market Currency
United States → USD
United Kingdom → GBP
European Union → EUR
Canada → CAD
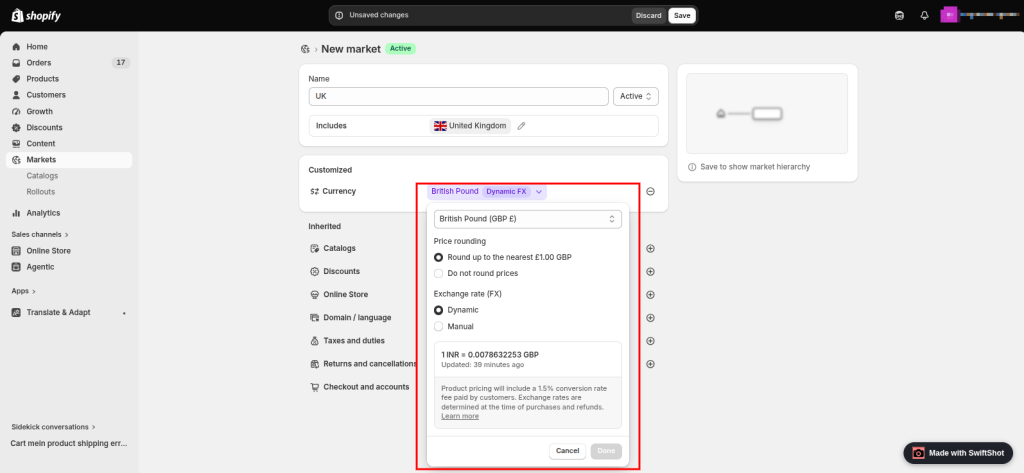
Shopify can convert prices into the market’s local currency using exchange rates. You can also configure market-specific pricing adjustments and price rounding where available.
Step 4. Configure Languages for Your Markets.
If you sell internationally, you may also want to display your store in the customer’s language.
From your Shopify admin: Settings → Languages
For example:
- English
- French
- German
- Spanish
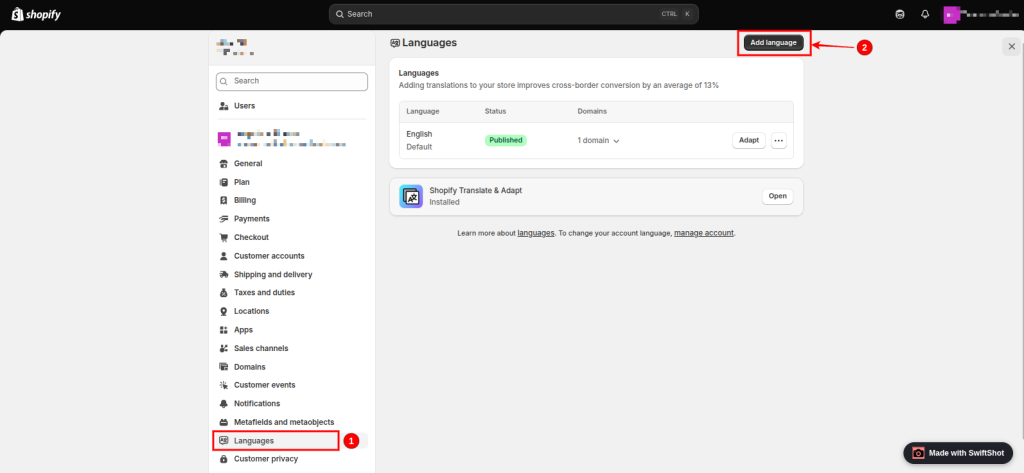
Make sure your important storefront content is translated, including:
- Product titles
- Product descriptions
- Collections
- Navigation
- Pages
- Theme content
- Checkout content where supported
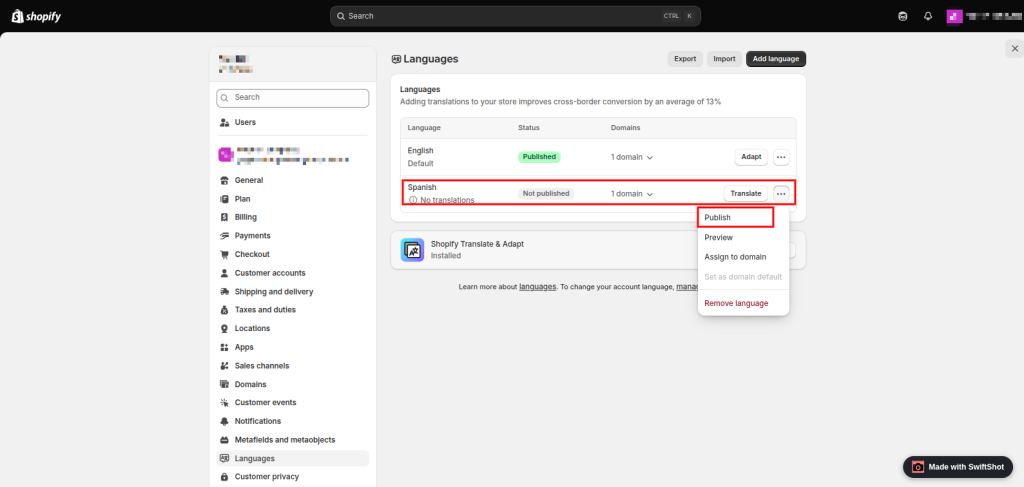
Currency and language are separate settings. Selecting a country does not automatically mean that every piece of storefront content has been translated. You need to use shopify translate apps for adding translation content.
Step 5. Configure International Domains
If you want different markets to use different URLs, Shopify supports international domain structures such as:
- example.com/fr
- fr.example.com
- example.fr
The exact options available depend on your domain and market configuration.
International domains can help customers recognize that they’re viewing a regional version of your store. Shopify also provides international domain and language management for market-specific URLs.
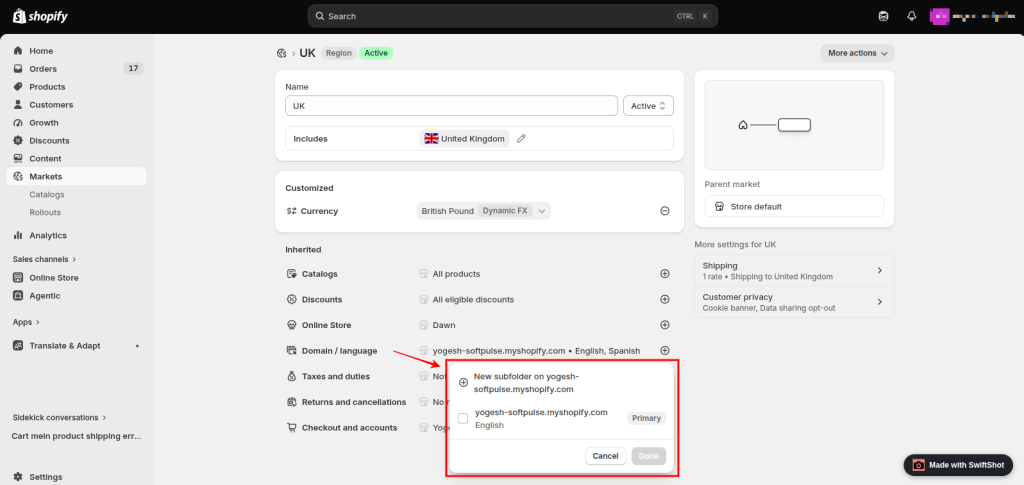
For example:
United States: example.com
France: example.com/fr
Germany: example.com/de
You don’t necessarily need a separate domain for every market. A subfolder, subdomain, or country-specific domain may be appropriate depending on your international strategy.
Step 6. Configure Taxes for the Market
International selling can involve different tax requirements depending on the customer’s location.
Review the tax settings for each market and configure the appropriate tax collection and registrations for your business.
Depending on the country, you may need to consider:
- VAT
- GST
- Sales tax
- Tax registrations
- Tax-inclusive pricing
- Tax-exclusive pricing
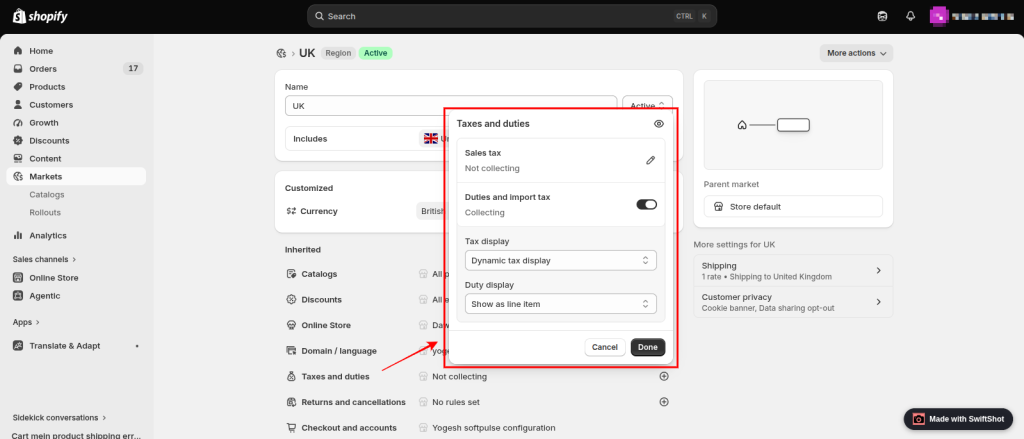
Shopify can help calculate taxes based on your configuration, but merchants remain responsible for understanding their tax obligations and registrations.
Do not assume that selecting a country or currency automatically configures all tax requirements.
Step 7. Configure International Shipping
Now configure shipping for the countries you’ve added to your markets.
From your Shopify admin: Settings → Shipping and delivery
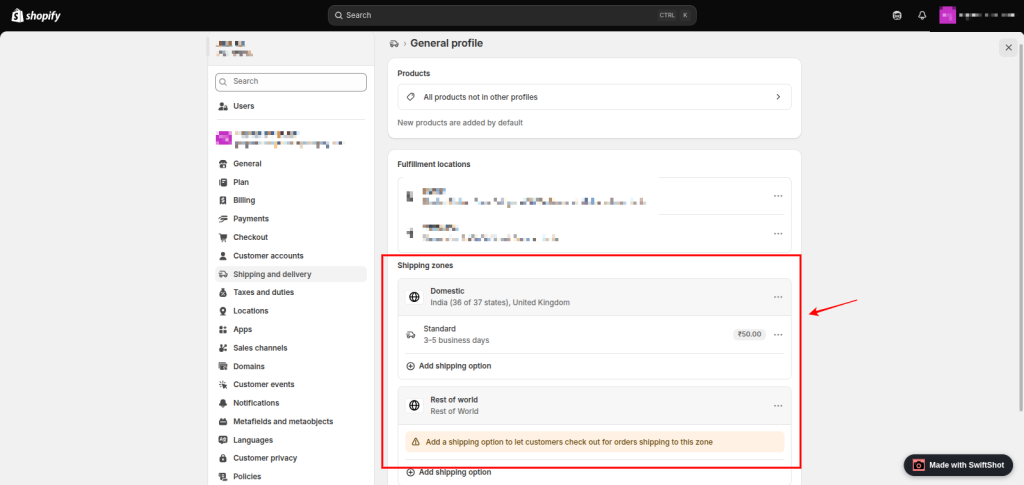
Open the relevant shipping profile and configure your shipping zones.
For example: United Kingdom
- Standard Shipping — £5
- Express Shipping — £12
- Free Shipping — Orders over £100
The actual rates depend on your shipping strategy and carrier setup.
A country needs to be correctly configured for both the market and shipping setup so customers can actually purchase and receive products.
Step 8. Add a Country/Region Selector
Many modern Shopify themes include country and language selectors. You need to enable a normal country/region selector and language selector.
Go to: Online Store → Themes → Edit theme
Then check your theme’s:
- Header
- Footer
- Localization settings
Look for options such as: Country/region selector and Language selector
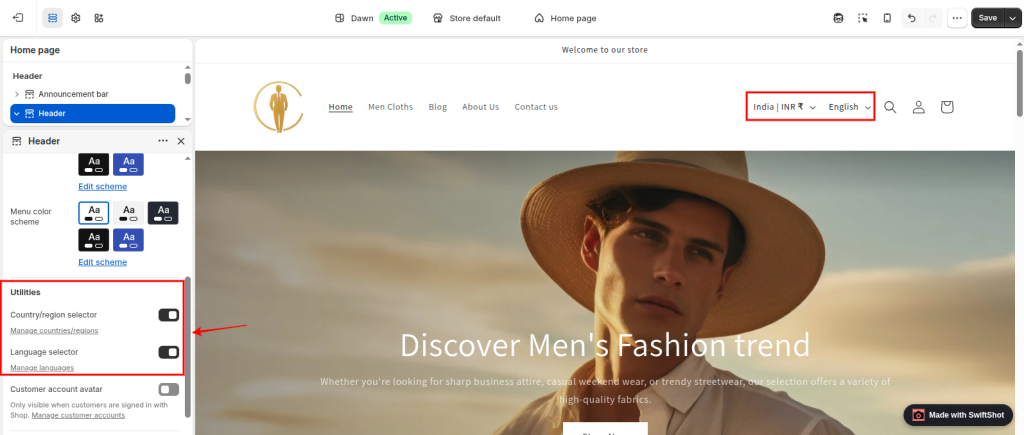
The exact location and wording can vary by theme.
A selector is useful because customers should always have a way to manually change their country.
For example, someone might be:
- Using a VPN
- Purchasing a gift for another country
- Browsing another market
Step 8. Decide Whether You Need a Location Popup
A normal country selector and a location popup serve different purposes.
Country Selector
The customer actively clicks the selector and chooses a country.
Location Popup
The store detects the customer’s approximate location and asks them to confirm it.
For example: Welcome!
It looks like you’re shopping from Canada.
Canada — CAD
[Shop in Canada] [Choose another country]
If you specifically want this type of popup, you’ll need a geolocation solution.
If you need professional help with Shopify Markets, international selling, or store customization, explore Shopify expert services from Softpulse Infotech
Add a Geolocation Popup
Shopify’s old Geolocation app should not be used for a new setup.
Shopify stopped allowing merchants to install its Geolocation app on February 1, 2025, and the app was shut down and removed from stores on March 24, 2025. Shopify has introduced automatic domain and browser-language redirection features that reduce the need for the old app.
If you need a consent-based location popup, especially for a setup where customers should confirm their location before switching markets, Shopify recommends using a compatible third-party geolocation app from the Shopify App Store in situations where such functionality is still required.
How to set it up: Simple Guide
- Go to the Shopify App Store.
- Search for a geolocation or country/market redirect app.
- Check that the app supports Shopify Markets.
- Install the app.
- Allow the required permissions.
- Select the countries/markets you want to use.
- Enable the location detection or country recommendation feature.
- Customize the popup design.
- Add a manual country-selection option.
- Save and test the popup.
Conclusion
Setting up a currency, shipping, and location pop-up on Shopify can make international shopping much easier for customers. Instead of leaving shoppers to figure out the correct market themselves, you can use Shopify Markets to organize countries, currencies, pricing, languages, domains, taxes, and shipping settings in one place.
Remember that the popup itself does not control your international selling configuration. It simply helps customers choose or confirm the market they want to shop from. Always test each market on both desktop and mobile to make sure the currency, pricing, language, products, checkout, and shipping options work as expected.
If you need help configuring Shopify Markets, international selling, or building a customized Shopify storefront, the Softpulse Infotech team can help you plan and implement the right solution for your store.
Frequently Asked Questions
1. Can I add a country selection popup to my Shopify store?
Yes. Shopify supports country and region selectors, while a location-detection popup can be added using a compatible third-party geolocation or market redirection app. The exact functionality depends on your theme and the app you choose.
2. Does Shopify automatically change the currency based on the customer’s location?
Shopify Markets can support different currencies for different markets. Depending on your configuration, Shopify can use the customer’s location and market settings to present the appropriate regional experience. However, merchants should still provide a manual country or region selector so customers can change their market when needed.
3. Does a location popup automatically configure shipping rates?
No. A location popup does not create or configure shipping rates. You need to configure shipping zones and rates separately under Settings → Shipping and delivery. The selected market and shipping configuration must both support the customer’s destination.
4. Is Shopify’s Geolocation app still available?
No. Shopify’s Geolocation app is no longer available for new installations. Shopify stopped allowing new installations on February 1, 2025, and the app was shut down and removed from stores on March 24, 2025. Merchants who need consent-based geolocation or market recommendation functionality should consider compatible third-party solutions.
5. How should I test a Shopify location popup?
Test each market from different locations or using appropriate testing methods. Check that the popup recommends the correct country, the currency changes correctly, market-specific pricing is displayed, the correct products are available, shipping rates appear, the language works where configured, and checkout behaves as expected. Also test the manual country selector and mobile experience.